Roof is not just a protective covering for our homes; it’s a crucial element that shapes the overall aesthetic and functionality of a property. From gable and flat designs to the materials we choose like asphalt shingles or metal, roofs come in various styles and options that can greatly influence a home’s character. Understanding these differences is essential for homeowners looking to make informed decisions about their roofing needs.
In this guide, we’ll dive into the various types of roofs, their maintenance, installation processes, and the latest design trends. Whether you’re considering a DIY project or just curious about what’s out there, we’ve got you covered with everything you need to know about roofs.
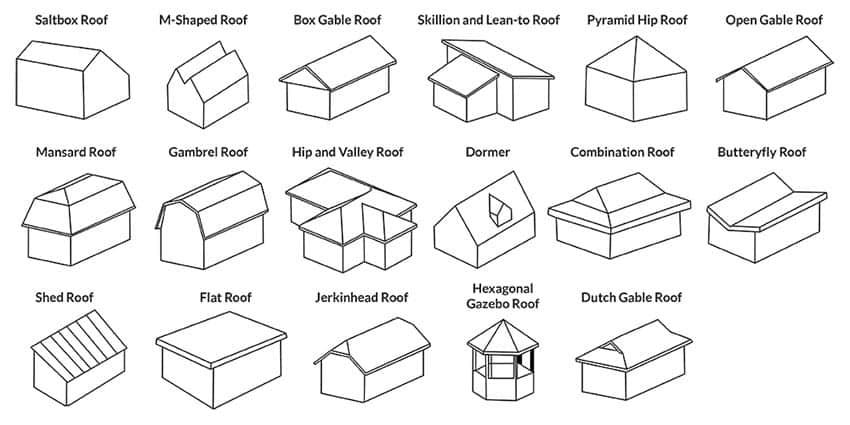
Types of Roofs
Roofs are a crucial part of any building, serving both functional and aesthetic purposes. Understanding the different types of roofs can help homeowners make informed decisions about construction or renovation projects. This section explores several common roof types, their material choices, and the advantages and disadvantages of each.
Characteristics of Roof Types
There are several common roof types, each with distinct characteristics that can affect the overall look and performance of a building. Below are the main types of roofs:
- Gable Roof: This roof features two sloping sides that meet at a peak, creating a triangular shape. Gable roofs are known for their simplicity and effective drainage, allowing rain and snow to slide off easily.
- Flat Roof: As the name suggests, flat roofs have a minimal slope, making them easy to construct and often less expensive. They provide additional space for rooftop decks or gardens but may require more maintenance to prevent water pooling.
- Hip Roof: A hip roof has slopes on all four sides that come together at the top to form a ridge. This design offers better stability and is more resistant to wind damage compared to gable roofs.
Comparison of Roofing Materials
Choosing the right roofing material is as important as selecting the roof type. Here are some popular materials and their characteristics:
- Asphalt Shingles: Affordable and easy to install, asphalt shingles come in a variety of colors. They typically last 15-30 years but may require replacement sooner in regions with harsh weather.
- Metal: Known for durability, metal roofing can last 40-70 years and is resistant to extreme weather, fire, and insects. However, it can be more expensive upfront and may require specialized installation.
- Tile: Tile roofs, often made from clay or concrete, offer longevity and an attractive appearance. They can last over 50 years but are heavier and generally more costly to install.
Advantages and Disadvantages of Roof Types and Materials
Understanding the pros and cons of each roof type and material is essential for making informed decisions. Below are key points to consider:
Each roof type and material presents unique benefits and challenges.
- Gable Roof:
- Advantages: Excellent drainage, simple design, and aesthetic appeal.
- Disadvantages: Vulnerable to high winds and may not provide attic space.
- Flat Roof:
- Advantages: Cost-effective, additional usable space, and easier installation.
- Disadvantages: Potential for water pooling and requires regular maintenance.
- Hip Roof:
- Advantages: Great wind resistance and aesthetic versatility.
- Disadvantages: More complex and potentially more expensive to construct.
- Asphalt Shingles:
- Advantages: Affordable, wide availability, and easy repairs.
- Disadvantages: Shorter lifespan compared to other materials, may fade or curl with age.
- Metal:
- Advantages: Long-lasting, energy-efficient, and recyclable.
- Disadvantages: Higher initial cost and may be noisy during rain or hail.
- Tile:
- Advantages: Durable, energy-efficient, and fire-resistant.
- Disadvantages: Heavy, requiring additional structural support, and higher cost of installation.
Roof Maintenance
Maintaining a roof is essential for ensuring its longevity and safeguarding your home from potential damages. A comprehensive maintenance plan not only extends the life of your roof but also prevents costly repairs in the future. Regular maintenance routines can help identify issues early, allowing for timely interventions that save both time and money.
Comprehensive Maintenance Plan
Developing a maintenance plan is vital for keeping your roof in optimal condition. Here are the key steps to include in your plan:
- Schedule regular inspections twice a year, ideally in spring and fall, to assess the roof’s condition.
- Keep the roof clean by removing debris such as leaves, branches, and dirt that can trap moisture and lead to mold growth.
- Inspect gutters and downspouts to ensure they are clear and functioning properly, directing water away from the roof and foundation.
- Check for any cracked, loose, or missing shingles, and plan for replacements as needed.
- Examine flashing around chimneys, vents, and skylights for signs of rust or wear, and reseal any gaps or cracks.
- Assess the attic for signs of water damage, mold, or inadequate ventilation, which can affect roof performance.
Steps to Inspect a Roof
Inspecting your roof for potential damage or wear is crucial. Here’s how to conduct a thorough inspection:
- Use binoculars or a drone for a safe aerial view of the roof, looking for visible signs of damage.
- Check the roof from ground level for sagging areas or any irregularities.
- Examine each shingle for cracks or curls that may indicate wear.
- Look at the condition of the gutters and downspouts for any water stains or rust, suggesting improper drainage.
- Inspect the attic for leaks, mold, or excessive heat build-up, which can indicate ventilation issues.
Common Roof Issues and Solutions
Several common issues can arise with roofs over time. Identifying these problems early can prevent significant damage. Below are some frequent roof issues along with their solutions:
- Leaks: Often caused by damaged flashing or shingles. Repair by replacing the damaged materials and sealing any gaps.
- Mold and Algae Growth: Caused by trapped moisture; prevent it by ensuring proper ventilation and cleaning the roof with a mixture of water and bleach.
- Ponding Water: Can lead to leaks and roof deterioration. Ensure proper drainage and consider installing additional gutters or downspouts.
- Shingle Damage: Can be due to harsh weather conditions. Replace damaged shingles and consider using impact-resistant options for better durability.
- Pest Infestations: Birds or rodents may nest in your roof structure. Use barriers to prevent entry and remove any nests promptly.
Regular roof maintenance can save homeowners up to 50% on repair costs by addressing issues before they escalate.
Roofing Installation
Installing a new roof is a significant home improvement project that requires careful planning and execution. Whether you’re replacing an old roof or building a new structure, the roofing installation process involves a series of steps that ensure durability and protection from the elements. Understanding this procedure is essential for homeowners who want to undertake the project themselves or engage professionals.
The roofing installation process consists of various stages, from preparing the site to laying down the final materials. Proper installation is crucial because it affects the overall integrity of your home and can prevent costly repairs in the future. Below, we Artikel the essential steps, tools, and materials involved in a roofing installation project.
Installation Procedures
The roofing installation involves several key steps that should be followed meticulously to ensure a successful outcome. Here’s a streamlined process to guide you:
1. Site Preparation: Clear the area around the home, ensuring safe access for workers and equipment. Remove any old roofing materials and inspect the underlying structure for damage.
2. Inspection of Underlayment: Check the existing roof deck for any signs of rot or structural damage. Replace any compromised plywood or other materials.
3. Installation of Underlayment: Lay down a water-resistant underlayment, which protects the roof deck from moisture. This layer is critical for preventing leaks and enhancing roof longevity.
4. Flashing Installation: Install flashing around vents, chimneys, and other protrusions to prevent leaks. Flashing directs water away from these vulnerable areas.
5. Shingle Installation: Begin laying shingles from the bottom edge of the roof and work your way up. Each row should overlap the one below it to create a watertight seal.
6. Ridge Cap Installation: Once the shingles are laid, install the ridge caps along the peak of the roof. This provides a finished look and further seals the roof.
7. Final Inspection: After installation, conduct a thorough inspection to ensure everything is installed correctly and securely. Look for any loose shingles or exposed nails.
Checklist for Tools and Materials, Roof
Before starting a roofing project, it’s essential to gather all necessary tools and materials. The following checklist covers the basics needed for a roofing installation:
– Tools:
– Hammer or nail gun
– Ladder
– Safety harness
– Utility knife
– Chalk line
– Roofing shovel (for removing old materials)
– Measuring tape
– Pry bar
– Caulking gun
– Materials:
– Shingles (as per your roof type)
– Roofing underlayment
– Flashing materials
– Roofing nails
– Ridge caps
– Ice and water shield (for colder climates)
– Adhesive sealant (for flashing)
It’s important to consult your roofing plan or professional guidance to ensure that you have all necessary materials tailored to your specific roofing needs.
Step-by-Step DIY Guide for Homeowners
Homeowners considering a DIY roof installation can follow these detailed steps to ensure a successful project. This guide is designed for those with moderate construction skills who are comfortable with heights and working on their roofs:
1. Research and Planning: Before beginning, research local building codes and obtain any necessary permits for roofing work. Familiarize yourself with the specific requirements for your roof type.
2. Safety First: Ensure you have proper safety gear, including a hard hat, non-slip shoes, and a harness. Safety should always be your top priority when working at heights.
3. Prepare the Roof Area: Clear debris from the roof and ground. Make sure you have a safe and stable ladder setup to access the roof.
4. Remove Old Roofing: Use a roofing shovel to carefully remove old shingles, flashing, and underlayment. Be cautious not to damage the roof deck.
5. Inspect and Repair the Deck: Look for any signs of damage in the roof deck. Replace any rotten or damaged wood to provide a solid base for the new roofing.
6. Install Underlayment: Roll out the underlayment from the bottom towards the peak, overlapping each row according to the manufacturer’s instructions. Secure it with roofing nails.
7. Flashing and Vent Installation: Install flashing around chimneys, vents, and other protrusions, ensuring a watertight seal. Install vents to allow proper airflow in the attic.
8. Lay Down New Shingles: Start from the bottom of the roof. Each shingle should overlap the previous row. Follow the manufacturer’s instructions for spacing and securing the shingles.
9. Install Ridge Caps: Finish with ridge caps at the peak of the roof. This gives a finished look and further protects against leaks.
10. Perform Final Checks: Inspect your work thoroughly. Look for any loose shingles or gaps in the flashing and make adjustments as necessary.
By following these procedures and using the checklist, homeowners can confidently tackle a roofing installation project, ensuring their home remains protected for years to come.
Roof Design Trends

In today’s fast-evolving world of architecture and design, roofs are no longer just functional elements; they are essential components of a home’s aesthetic appeal and energy efficiency. Recent trends in roof design reflect a blend of style, sustainability, and regional adaptability. Homeowners are increasingly looking for roofing options that not only enhance their property’s visual appeal but also support eco-friendly practices and respond to local climatic conditions.
One of the most significant trends in roofing design is the shift towards sustainable roofing options that help reduce the environmental impact of homes. These options are not only beneficial for the planet but can also lead to significant energy savings for homeowners.
Sustainable Roofing Options
The growing emphasis on sustainability has led to various innovative roofing materials and techniques that prioritize both ecological benefits and functionality. Here are some popular sustainable roofing options gaining traction:
- Green Roofs: Also known as living roofs, green roofs are covered with vegetation, providing insulation, reducing urban heat, and improving air quality. They offer a natural aesthetic while promoting biodiversity.
- Cool Roofing: Cool roofs reflect more sunlight and absorb less heat than standard roofs, significantly lowering energy costs. This roofing is particularly useful in warmer climates, as it helps mitigate the urban heat island effect.
- Recycled Materials: Roofing made from recycled materials, such as rubber or metal, reduces waste and provides durable, long-lasting options. These materials can often mimic traditional styles while offering superior performance.
- Solar Roofs: Integrating solar panels directly into roof designs can generate renewable energy, helping to offset electricity costs. This option is becoming increasingly popular as technology advances and costs decrease.
Impact of Climate on Roofing Design Choices
Different climates necessitate specific roofing designs to ensure durability, efficiency, and comfort. Homeowners are tailoring their roofing choices based on the climatic conditions prevalent in their regions.
In regions with heavy rainfall, for instance, steeper roofs are favored to facilitate water runoff and prevent water pooling, which can cause leaks and structural damage. In contrast, areas experiencing high wind conditions often require roofs with aerodynamic shapes to minimize wind resistance and potential damage.
Additionally, in hot climates, materials that reflect sunlight, such as light-colored tiles or metal roofing, are preferred to keep homes cooler. Conversely, in colder climates, roofs with better insulation properties are essential to conserve heat during winter months. This targeted approach to roofing design ensures that homeowners make informed decisions that align with their environmental conditions.
The right roofing design can significantly enhance a home’s longevity and energy efficiency, while also contributing positively to the environment.
If you’ve ever enjoyed the classic musical, you know that Fiddler on the Roof offers a beautiful blend of tradition and change. It tells a poignant story about family, culture, and the struggles of modern life. Speaking of contemporary themes, if you’re looking for a budget-friendly stay, the Red Roof Inn provides a comfortable and convenient option for travelers on the go.
The charm of Fiddler on the Roof lies in its exploration of deep-rooted traditions and the personal sacrifices made in their name. After a long day of absorbing such rich narratives, you might want to unwind at a reliable place like Red Roof Inn , where you can kick back and enjoy a good night’s sleep without breaking the bank.