Tin roof serves as a cornerstone of durable and stylish roofing options, captivating homeowners and builders alike with its versatility. Whether you’re considering a shiny new installation or looking to spruce up your existing roof, understanding the various types of tin roofs, their installation process, and maintenance is essential. This guide will walk you through everything you need to know, from the differences between galvanized, galvalume, and aluminum roofing to tips for keeping your roof in top shape year-round.
Types of Tin Roofs
Tin roofs are a popular choice for both residential and commercial buildings due to their durability, affordability, and aesthetic appeal. They are lightweight and can be installed over existing roofs, which simplifies the installation process. Among the various types of tin roofs available, three prominent materials are commonly used: galvanized steel, galvalume, and aluminum. Each type has its own unique properties that cater to different needs and preferences.
Galvanized Steel Roofing
Galvanized steel roofing is steel coated with a layer of zinc to prevent rusting. This process significantly enhances the durability and lifespan of the roofing material. The galvanized coating provides excellent corrosion resistance, making it suitable for various climates.
Advantages:
- Cost-effective compared to other metal roofing types.
- High strength and durability, offering a long lifespan (typically 20-50 years).
- Easy to install and repair, which can save on labor costs.
Disadvantages:
- Can be prone to rust if the galvanized coating is damaged.
- Less energy-efficient as it can absorb heat, leading to higher cooling costs in hot climates.
- Requires periodic maintenance to ensure longevity.
Galvalume Roofing
Galvalume roofing combines the benefits of both aluminum and zinc, featuring a steel base coated with a mixture of aluminum and zinc. This type of roofing is known for its excellent resistance to corrosion, particularly in harsh environments.
Advantages:
- Superior corrosion resistance, particularly in salty or industrial environments.
- Lightweight and easy to handle during installation.
- Long lifespan of about 30-70 years, extending the life of the roof.
Disadvantages:
- Generally more expensive than galvanized steel.
- Can be vulnerable to scratches and dents, which may compromise the coating.
- Requires careful installation to prevent moisture traps that can lead to rust.
Aluminum Roofing
Aluminum roofing is lightweight, resistant to corrosion, and offers a unique aesthetic appeal. It is often favored for coastal homes due to its exceptional resistance to saltwater corrosion.
Advantages:
- Highly resistant to rust and corrosion, making it ideal for wet or coastal environments.
- Reflects sunlight, which contributes to energy efficiency in hot climates.
- Very lightweight, making transportation and installation easier.
Disadvantages:
- Higher initial cost compared to steel options.
- More prone to damage from hail or heavier impacts due to its softer composition.
- Color options can fade over time if not treated properly.
Installation Process
Installing a tin roof is a manageable task that can significantly enhance the durability and aesthetic of your home. With the right tools, materials, and a clear step-by-step approach, you can achieve a professional-looking installation. This section lays out the installation process, highlights necessary tools, and emphasizes safety precautions to ensure a smooth experience.
Step-by-Step Installation Process
A successful installation of a tin roof relies on careful planning and execution. Below is an Artikel of the essential steps involved in the installation process:
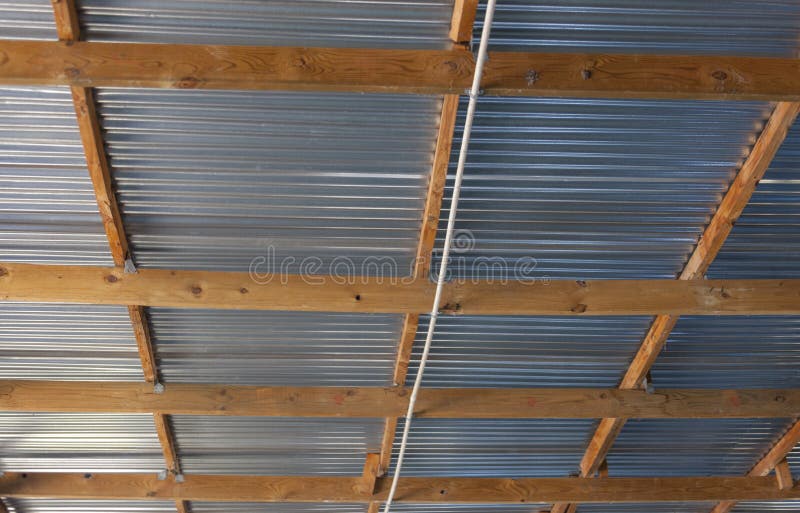
- Preparation of the Roof Deck: Ensure that the existing roof is cleared of debris and inspected for damages. Any rotten or damaged areas must be repaired for a solid foundation.
- Installation of Underlayment: Lay down a high-quality underlayment, such as synthetic felt or a similar product, to provide additional moisture protection.
- Measuring and Cutting Panels: Measure the roof dimensions accurately and cut the tin panels as required. Use a snip or metal shears for precise cuts.
- Starting the First Panel: Begin at the bottom edge of the roof, ensuring the first panel is aligned correctly. Fasten it in place with screws, making sure to use the recommended spacing.
- Continuing with Subsequent Panels: Overlap each panel according to the manufacturer’s instructions, and secure them tightly to avoid leaks.
- Installation of Ridge Caps: Install ridge caps along the peaks of the roof to ensure proper ventilation and to finish off the roof’s appearance.
- Final Inspection: After installation, inspect the roof thoroughly for any gaps, loose screws, or missed areas. Make any necessary adjustments.
Tools and Materials Required
Gathering the right tools and materials is crucial for an effective installation. Here’s what you’ll need to get started:
Having the proper tools on hand not only speeds up the installation process but also ensures that the job is done correctly.
- Tools:
- Measuring tape
- Metal snips or shears
- Drill with metal drill bits
- Impact driver
- Level
- Ladder
- Safety harness (for steep roofs)
- Materials:
- Tin panels
- Underlayment
- Roofing screws
- Ridge caps
- Sealant (for extra waterproofing)
Safety Precautions
Safety is paramount during any roofing project. Here are key safety precautions to consider throughout the installation:
Using safety gear and following proper protocols can prevent accidents and injuries.
- Always wear safety glasses to protect your eyes from metal shavings.
- Utilize a hard hat to safeguard against falling objects.
- Employ a safety harness if working on steep roofs or at significant heights.
- Ensure your ladder is stable and placed on a flat surface before climbing.
- Never work in wet or windy conditions to avoid slips and falls.
- Have a buddy system in place; it’s safer to work with someone else.
Maintenance Tips
Maintaining your tin roof is essential for ensuring its longevity and performance. With the right care and attention, a tin roof can last for decades. Regular maintenance not only helps prevent costly repairs but also enhances your home’s overall aesthetic. This section Artikels best practices for maintaining tin roofs, common issues that may arise, and a handy seasonal maintenance checklist for homeowners.
Best Practices for Maintenance
Proper maintenance of your tin roof is crucial for preventing rust, corrosion, and other potential issues. Regular inspections and cleaning can extend its lifespan significantly. Here are some best practices to follow:
- Conduct regular inspections at least twice a year, checking for signs of damage or wear.
- Clean the roof surface to remove debris, leaves, and dirt that can trap moisture and lead to rust.
- Ensure the gutters and downspouts are clear to prevent water accumulation on the roof.
- Apply a protective coating every few years to enhance durability and resistance to corrosion.
Common Issues and Solutions
Tin roofs, while durable, can face a few common issues. Addressing these problems promptly can save you from larger repair costs down the line. The following are typical issues and how to resolve them:
- Rust spots: These can develop over time due to exposure to moisture. Use a wire brush to remove rust, then treat the area with a rust-inhibiting primer and paint.
- Loose seams: Over time, seams can loosen, leading to leaks. Reinforce them using a high-quality adhesive or seam tape designed for metal roofing.
- Corrosion: If you spot areas of corrosion, clean them thoroughly and apply a protective coating to prevent further damage.
- Leaks: Regularly check for leaks, especially after storms. Repair minor leaks promptly with waterproof sealant to avoid extensive damage.
Seasonal Maintenance Checklist
To keep your tin roof in top shape, it’s beneficial to have a seasonal maintenance checklist. This ensures you cover all necessary tasks throughout the year. Here’s a simple checklist to follow:
- Spring: Inspect for winter damage, clean gutters, and remove any debris.
- Summer: Check for rust and corrosion, and clear any tree branches that may fall on the roof.
- Fall: Clean the roof and gutters again, and prepare for winter by checking insulation and ventilation.
- Winter: Monitor for ice dams and snow accumulation to prevent added weight on the roof.
“Regular maintenance ensures that your tin roof remains in excellent condition, prolonging its life and maintaining its charm.”
Aesthetic Considerations

When it comes to enhancing the visual appeal of both residential and commercial properties, tin roofs offer a versatile solution that combines functionality with style. Their aesthetic potential is often overlooked, yet the variety of colors and finishes available can significantly impact the overall design of a building. Incorporating tin roofs into diverse architectural styles can create distinctive looks that stand out in any neighborhood.
Tin roofs come in a wide range of colors and finishes that cater to different design preferences. From vibrant shades like deep red and bright blue to more subdued tones like matte black and earthy green, the color choices are nearly endless. Additionally, finishes can vary from smooth to textured, offering a unique look that can complement or contrast with other building materials. This flexibility allows homeowners and architects to create a cohesive design that fits the overall aesthetic of the structure.
Color Options and Finishes
Choosing the right color and finish for a tin roof is crucial for achieving the desired aesthetic. The options available can be categorized as follows:
- Solid Colors: Bright and bold colors can make a striking statement, ideal for modern designs or playful homes. Colors like fire-engine red or ocean blue can bring a dynamic touch to a property.
- Matte Finishes: These provide a subtle elegance and are great for traditional homes. Matte black or muted greens can blend well with natural surroundings.
- Textured Finishes: Options such as ribbed or corrugated surfaces add depth and dimension, enhancing the visual complexity of the roof.
- Reflective Coatings: These can increase energy efficiency while providing a shiny, polished look that is particularly popular in contemporary architecture.
Design Ideas for Architectural Styles
Integrating tin roofs into various architectural styles can enhance their character. Here are some ideas for successful applications:
- Modern Homes: Tin roofs in bold colors can create a striking contrast with sleek lines and large windows, showcasing a contemporary aesthetic.
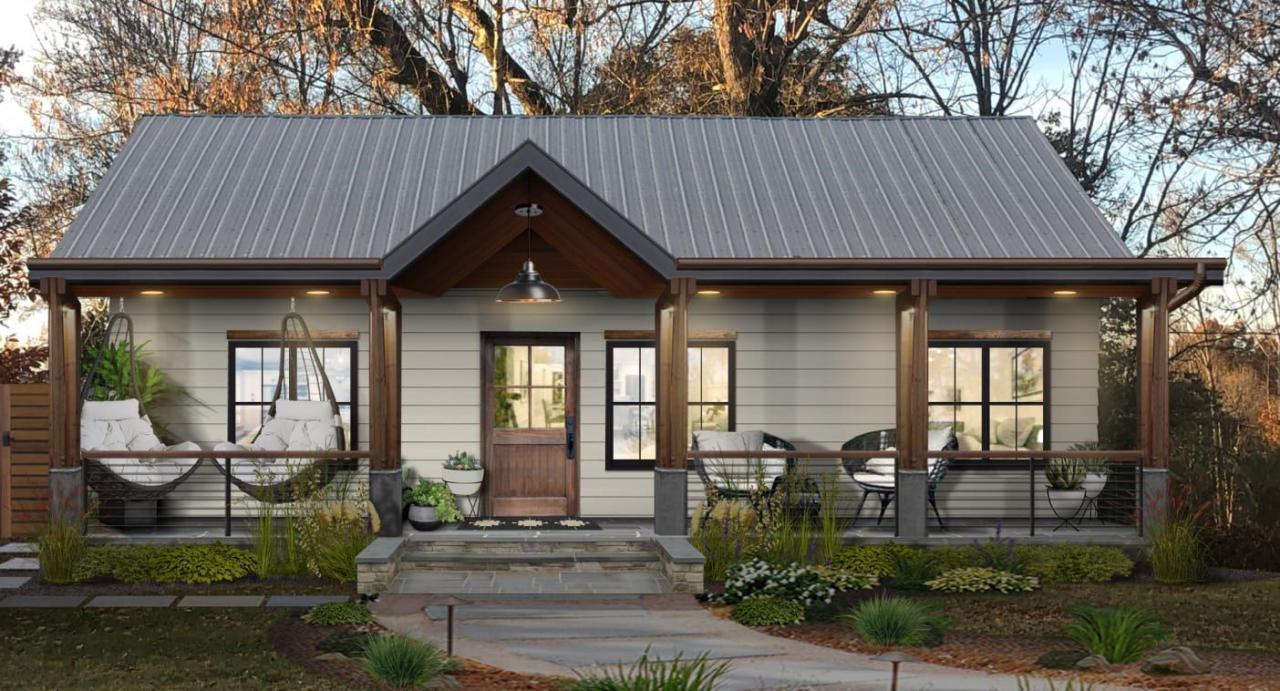
- Traditional Farmhouses: A classic tin roof in a muted color complements wooden siding and rustic features, evoking a sense of nostalgia and charm.
- Industrial Spaces: The raw, utilitarian look of corrugated tin fits perfectly in industrial designs, often paired with concrete and steel for an edgy vibe.
- Beach Houses: Brightly colored tin roofs in shades like aqua or coral can reflect the surrounding coastal environment, enhancing the relaxed vibe of a beach property.
Successful Applications of Tin Roofs
Several residential and commercial buildings have embraced tin roofs to enhance their aesthetic appeal. Notable examples include:
- Residential Example: The “Tin House” in Austin, Texas features a striking metallic roof that complements its modern architecture while providing durability against the hot Texas sun.
- Commercial Example: The “The Steel House” in New York boasts a sleek tin roof that contrasts with its glass facade, creating an eye-catching urban landmark.
- Eco-Friendly Example: The “Green Roof” initiative by a local café in Seattle incorporates a tin roof painted in a reflective white finish, enhancing energy efficiency while blending with the modern design.
“The right color and finish on a tin roof can transform a building from ordinary to extraordinary, making it a key component of the overall design.”